When taking pictures of people who aren't models, it's important to recall what it's like to be in their shoes.
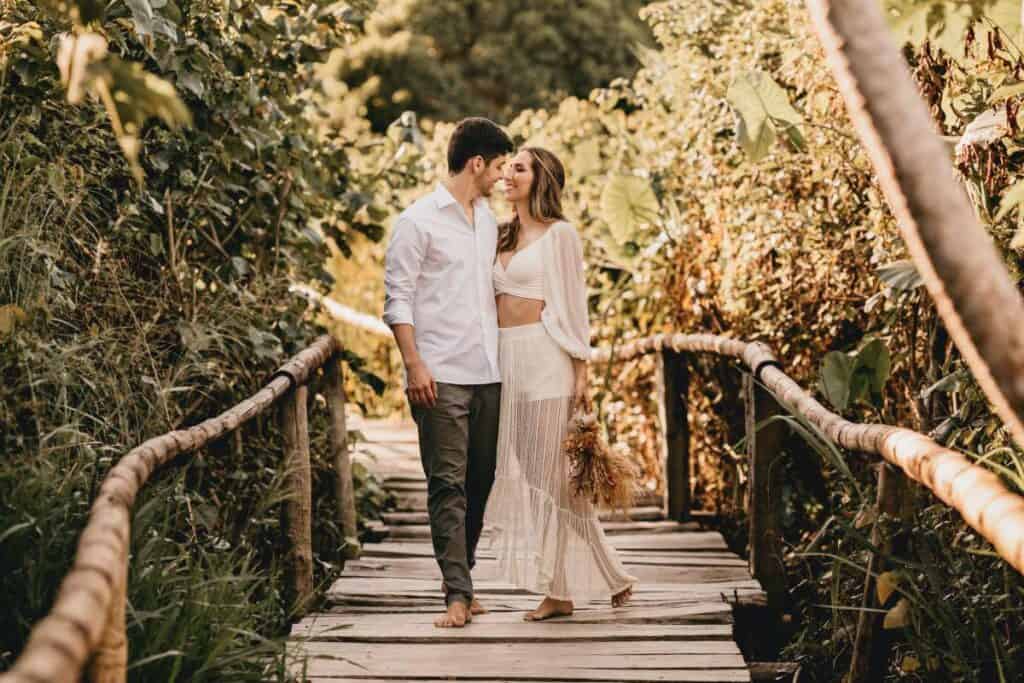
If you're taking a portrait of a single person, a couple, or a large group of people, it's especially important to put your subject at ease if you plan on taking a full-body shot. A person's sense of vulnerability increases in proportion to the amount of themselves that is visible in a photograph.
The first thing most people want to know is what to do with their hands, and second is where they should look. In order to reduce the number of questions they have, you should provide firm, specific instructions. Do not give them the opportunity to ask the question.
Tell them ahead of time that you'll be directing them and that they don't need to worry about a thing before you even pick up the camera. Taking a full body portrait is a lot more work than taking a head and shoulders photo of a subject.
Because shooting full-body subjects requires more preparation in terms of lighting, camera positioning, lens selection, and model posing.
To pose, less of a person is needed in headshots or three-quarter length portraits. How much simpler! Making your subject feel at ease is only half the battle when shooting full-body portraits; you also need to pay close attention to their entire body.
This includes:
- Posing
- Hair and clothing
- Camera angle
- Background
- Camera settings
- Lens choice
Before discussing where you should stand, what angle you should shoot from, and other technical considerations, let's zero in on our subject.
Table of Contents
Posing

For full-figure portraits, hand placement is crucial. The vast majority of people you will photograph have never modelled before, so they may feel uncomfortable posing.
They are at a loss as to how to handle them. Most just leave them hanging loosely.
Correct posture is also crucial. Let's say someone has a hunched back or holds their head in an unattractive way.
Avoid that at all costs! Considerable weight should be placed on the feet and legs in a particular position. In the past, I have gone into detail about the best ways to photograph a bride and groom as they prepare for their big day. You can use any and all of those poses here.
It's not right to have the legs touching. Put them in a position where they're putting their weight on their back leg. That leaves the other leg free to be positioned however the user prefers, such as with a slight bend.
Posing for full-body photography
In order to capture a great portrait, the photographer must pay closer attention to their subject than they would when shooting a lifestyle shoot.
Both documentary and lifestyle photography focus on the subject's entire body, but the latter emphasises the subject's expression and typically features a lot of action.
Portrait photography, on the other hand, is more concerned with the subject's posing and the camera's angle in order to highlight the subject's best features.
Any photographer, whether shooting indoors or out, should keep this in mind. They are complementary rather than competitive; each has its own strengths and weaknesses.
Consequently, the following body-positive posing advice is more focused on portrait photography than it is on lifestyle photography.
Posing the whole body from the feet up
Facing the camera at a 45-degree angle makes you look slimmer and less aggressive than when you face it straight on.
Place weight on the back foot
Shape is created by putting more of one foot forwards than the other, and the subject appears more at ease when standing this way than when standing with equal weight on both feet.
Ask your model which leg they use to wait in line at the store so that the pose appears natural. If they are waiting in line at the cash register, which leg do they stand on? That person's "back leg" should be the one they report being their primary weight-carrying limb.
However, not everyone favours a single leg when walking. A minority of people actually do balance their weight evenly on both feet while standing.
Bend one knee
Shape is created once more by bending one knee. An attractive S shape, which is more attractive to the eye and more interesting to compose, can be achieved in this way, and it's a great place to start for women.
Let the hips fall to one side.
Hip placement is also different between sexes. An additional crucial method for achieving the S curve in full-body portraits of women is popping the hip to one side.
The normal way they stand "in a shopping queue" should be exaggerated here. Popping the hip isn't necessary for a manly stance.
Asymmetrical shoulders look great.
This, too, should come easily. In order to get a flattering full-body portrait, your subject shouldn't feel awkward or forced.
Stand up and assume the relaxed stance of someone waiting for the bus or in a line.
When you carry something heavy, you might feel a slight dip in your shoulder on the loaded side, which can cause your posture to look off. If you stretch this out a bit and maybe lift the other shoulder, you'll have the foundation for a great full-length pose.
Arms and hands in photos
We've reached the section where a lot of people pose for full-body shots. Having something to do with one's hands is essential for photo posing, especially for men.
Try thinking about things from a different angle. Simply by changing the position of your arms, you can achieve a wide variety of different body-positive poses. If you have one hand in a pocket or on your hip, your free hand should hang loosely.
If you're a woman, you should stand with one leg bent and one hand on your hip or folded across your body. Your other hand should come up to your collar bone or jawline.
Holding onto the lapels of a jacket is permitted, but only if one hand is raised above the other. You need not be so dogmatic about asymmetry.
Men can rest their hands in their pockets or on their hips, clasp their hands in front of them, adjust their cuffs, or fold their arms.
One last word of advice on how to pose for photos: consider whether or not the subject's body language conveys the message you want to convey. Keep an eye out for foreshortening, which can make your subject's body or limbs appear shorter than they actually are.
Lean forward from the waist
Though she's still facing you head-on, the model can now lean forwards at the waist. Pose your subject so that they lean forwards slightly from the waist, which will improve the photo (toward you).
Cross arms
Models who cross their arms at the chest are currently fashionable for use in professional headshots. This conveys a sense of assurance and power. But if the model leans her head backwards, things can go wrong.
Women are more likely to make this mistake than men because they tend to tilt their heads more when taking pictures. Instead, you should tell your subject explicitly to jut forwards and slightly lower their chin. Your client will want this shot because of the simple adjustment.
Don't take too long posing subjects.
A lot of preparation is required before firing, but you can't afford to waste time. Therefore, there is no urgency, but you should do a good job as soon as possible. Those in the frame experience the passage of time very slowly, so it's important to keep a shoot moving to keep everyone's enthusiasm high and get great shots.
At this point, you should feel confident in your ability to discuss this topic. So, let's take a look at how you can improve your full-length photography, specifically:
- Camera angle
- Background and foreground
- Camera settings
- Lens choice
Camera angle for full-body portraits
Selecting the appropriate lens for a full-body portrait is as important as finding the right camera angle. The term "camera angle" describes the position of the camera during a shot. There is no rule that says you can't play around with the perspective and focal length of your shots.
Try different things out until you find what works best for you. But here are some guidelines to follow in general:
- Avoid getting too close when using a wide-angle lens.
- Do not use a wide-angle lens and get too close to your target. You will be cutting the model's legs shorter and lengthening the upper body. We've also covered how this can cause some peculiar facial features. Absolutely never is that a good thing to happen.
- To get the best shot, get down to about waist level. The method is both overused and boring.
- Just to see the difference it makes, try shooting from a low camera angle. For the most part, when a person is shot from below, their legs look longer and their upper body looks smaller (and therefore shorter).
Because camera angle has such a dramatic effect on how a subject appears in a photograph, taking full-length portraits can be a bit of a leg-stretching exercise for those of us who are on the taller side.
One of the most flattering camera angles for full-body portraits is achieved by kneeling down to take the picture. For this reason, most full-body portraits are shot from above the subject's waist. That's why you should mix things up a bit by adding in some new pointers.
Laying flat on the ground, with your camera pointed up at your subject, will put you at about knee level. It makes for an interesting picture by giving the subject authority over the viewer and altering the typical viewpoint.
Instead, you should rise above your subject and shoot downward.
This shifts the power dynamic from the photographer to the viewer, which drastically alters the mood of the image. This is not a typical shooting position for politicians. If you don't want your subject's feet to look too small in the final image, give them more room to move their head up.
Background & foreground in full-length portraits
When photographing a person, the more of them you include, the more prominent the background and foreground will be. When taking pictures outside, it's important to pick a spot where there won't be too much going on in the foreground or background.
Further enhance the image by giving deliberate consideration to the elements of the background and foreground. Make better use of the white space to enhance the overall visual appeal of the image. How wide of an aperture to use is a question that arises when you take into account your surroundings.
Aperture for full-body photography
Full-body portraits benefit from a wide-open aperture, which blurs the background and helps to isolate the subject from its surroundings.
Maximum Aperture of the Lens
When choosing a portrait lens, the maximum aperture is also important.
With a large maximum aperture, the problem area will stand out against a blurred background. The majority of portraits shot with this imaginative effect are aesthetically pleasing.
That said, take it with a grain of salt. In addition, you should try shooting with a small aperture. If the location is pleasant and could potentially enhance the photograph, you should make an effort to include it.
I don't think it's necessary to completely blur the background, so I avoid very wide apertures. Turns out F4 is where most of my shots are taken. There's certainly nothing wrong with wide gaps in photography per se; they're just not my personal preference.
In some cases, such as an environmental portrait, it is important to have a clear image of the background. The use of a wide aperture isn't the only way to achieve a blurred background; subjectivity also plays a role.
Don't lose hope if your widest aperture is f5.6 and you still want a shallow depth of field.
Simply ensure that the foreground-to-subject distance is smaller than the background-to-subject distance. Alternatively, you could employ a telephoto lens.
Best Lenses for Full Body Portraits
If you want to capture your subject's entire body in a portrait, a wide-angle lens isn't the way to go. Distortions occur most noticeably in the corners and edges when using a wide-angle lens.
If you use a wide-angle lens, your model will look distorted. Covering a lot of ground with a wide-angle lens. Therefore, you need to get in close for a clear shot. It's because of this that we see such skewed results.
Small studios present additional challenges when using a wide zoom lens.
Something in the range of 50–70 millimetres is ideal. With a Tele lens, on the other hand, you can't get close enough to the subject to remove unwanted background elements. Your subject will be shrunken in relation to the background.
However, if you have to choose between a wide-angle zoom and a telephoto, go with the latter. When using a telephoto lens, the effect is much more subtle and unobtrusive. Plus, it's best to shoot at a distance and zoom in rather than getting up close and personal.
The above factors will affect your choice of lens focal length before I discuss lenses for full-body portraits. For instance, using a wide-angle lens, say 35mm, will not help you blur the background, especially at apertures smaller than F4.
In addition, I think it's important to get comfortable making do with improvised tools and backdrops when practising portrait photography. Putting aside the other variables in the camera's settings, the focal length you choose will affect how your subject appears in the final image.
35mm lens
When shooting with a 35mm lens, centre the subject in the frame. Elements near the frame's edges will be stretched by the wide-angle lens. When shooting full-body portraits from a wide angle, it's important to keep the camera level. You can use this to your advantage by shooting from a low angle to make your legs appear longer.
But when shooting upwards with a 35mm lens, the resulting lollipop effect emphasises the head at the expense of the rest of the body.
50mm lens
The view from a 50mm lens is the most common, as it is the most similar to the way our eyes take in a scene. A 50mm lens, with a wide aperture like F1.4 or F1.8 to soften the background, is ideal for such full-body shots.
85mm and 105mm
Both the 85mm and 105mm focal lengths are great for portrait photography because of how they frame the subject.
Taking a full-length portrait with a 105mm lens would require you to stand quite a distance from your subject, which would be awkward for directing and would diminish the intimacy between you and your subject. You can get past it very quickly. On the other hand, you could improve your abilities by exerting more effort.
Lighting for Indoor Full Body Portraits
When taking full-body portraits, it's important to have control over the subject's lighting. This is not the time to use a single, compact flash with a diffuser.
The light produced by flash units is typically bright and compact, but their size limits their utility. You'll require a stronger light source, such as a strobe and softboxes for one or two lights. By diffusing the light from a flash with a softbox, the harshness of a bare flash can be mitigated.
These softboxes additionally increase the coverage area of handheld flashes. These softboxes actually contain reflectors, which helps to create even more light. In addition, there are baffles in the front that disperse the light even more.
Using an egg-crate (grid) while shooting may be useful in some instances; however, it is not necessary when taking full-body portraits. If I'm lighting a model in a studio, I always reach for the strip boxes. When shooting in natural environments, they also perform admirably.
Conclusion
Taking a full-body picture is a lot more labor-intensive than just a head and shoulders shot. This entails setting up the scene with the right lighting, camera angle, lens, and model pose. The more of oneself is shown in a photograph, the more exposed that individual feels. Instead of competing with one another, portraiture and lifestyle photography compliment one another. In a portrait, the photographer needs to pay more attention to the subject's posing than in a lifestyle photo shoot.
Taking a full-body portrait of a subject without making them feel uncomfortable is key to getting a good result. You may strike a broad number of empowering stances just by rearranging your arms. Foreshortening, which can happen in photography, will make your subject's body seem shorter than it actually is, so keep an eye out for that. Time is of the essence when taking a full-body photograph of a subject. Though there is much to do before shooting, you should not squander any time.
Finding the correct subject is essential, but so is composing the shot with the right lens and perspective. These days, most full-body pictures are taken at or above the subject's waist. If you choose a large aperture, you can separate your subject from its background. You should find a place where there isn't a lot going on in the foreground or background when taking images outside.
FAQs About Photography
Full body portraits involve a lot more work than when you are photographing just the head and the shoulders. Why? Because when you incorporate the full body in your imagery, you have to focus on posing your model, choosing the right lens and camera angle, using more light, and spending more time setting things up.
A 50mm lens will give you the most normal view – i.e. the closest to how our eyes see a scene. So, a 50mm would make a good lens for full body pictures, especially with a wide aperture of F1. 4 or F1. 8 if you want to blur the background.
1/200th of a second
However, it is best to use a fast shutter speed for most traditional portraits to capture the moment without any blur. A typical portrait during the daytime without using flash is best taken with a shutter speed of at least 1/200th of a second handheld or 1/15th of a second on a tripod.
The cinematic look is done using a 65mm focal length. 50mm is 15mm wider than that, while 85mm is 20mm longer. So if you truly want a cinematic look, go for a 50mm. If you want a more classic portrait shoot look, reach for an 85mm lens.
Portrait photography can be tough. There are a few simple mistakes that I see portrait shooters make over and over again, mistakes that seriously detract from their images.
CONTENT SUMMARY
- If you're taking a portrait of a single person, a couple, or a large group of people, it's especially important to put your subject at ease if you plan on taking a full-body shot.
- Put them in a position where they're putting their weight on their back leg.
- Consequently, the following body-positive posing advice is more focused on portrait photography than it is on lifestyle photography.
- Simply by changing the position of your arms, you can achieve a wide variety of different body-positive poses.
- One last word of advice on how to pose for photos: consider whether or not the subject's body language conveys the message you want to convey.
- Instead, you should tell your subject explicitly to just forward and slightly lower their chin.
- Selecting the appropriate lens for a full-body portrait is as important as finding the right camera angle.
- For this reason, most full-body portraits are shot from above the subject's waist.
- Instead, you should rise above your subject and shoot downward.
- Further enhance the image by giving deliberate consideration to the elements of the background and foreground.
- However, if you have to choose between a wide-angle zoom and a telephoto, go with the latter.
- Putting aside the other variables in the camera's settings, the focal length you choose will affect how your subject appears in the final image.
- When shooting with a 35mm lens, centre the subject in the frame.
- But when shooting upwards with a 35mm lens, the resulting lollipop effect emphasises the head at the expense of the rest of the body.
- A 50mm lens, with a wide aperture like F1.4 or F1.8 to soften the background, is ideal for such full-body shots.85mm and 105mm.
- Both the 85mm and 105mm focal lengths are great for portrait photography because of how they frame the subject.
- When taking full-body portraits, it's important to have control over the subject's lighting.
- By diffusing the light from a flash with a softbox, the harshness of a bare flash can be mitigated.