
A great shot may seem easy to take for the uninitiated: just point and shoot. However, as everyone who has attempted to master professional photography knows, there is much more to it than that.
It takes a lot of thought to take a great photo, from picking the perfect subject to arranging a pleasing composition to locating the ideal lighting. Here are some suggestions to help you improve your photography skills. Learning and applying even a few of these fundamental strategies used by the pros should significantly boost your performance.
Knowing how to shoot professional photographs has several advantages. It opens up doors to possibilities. Your online photography portfolio will look better the more professional your photographs are. More photography jobs will come your way if your internet portfolio appears good. Whether you're a professional photographer or just enjoy shooting images for pleasure, mastering photography is a talent that will serve you well in the design and illustration fields.
You've got one of the greatest cameras for artists at your disposal; now what? With the knowledge you gain from this crucial photography crash course, you will be able to take better photos.
This manual will help you solidify your knowledge of photographic fundamentals, such as focus, composition, white balance, and lighting, while also helping you break poor habits. We'll show you how to make the most of your DSLR's features to improve your photography. These photography resources have lots of advice, and this DSLR cheat sheet is great for beginners or as a refresher for more experienced photographers.
Check out our extensive list of Wedding Photographers in Melbourne to help capture your special moments.
Table of Contents
FAQs About Wedding Photography
Some photographers like a lot of bright colors, while others prefer a more muted color scheme. Regardless of your style, adjusting colors will make your photos look more professional. There are many tools for doing this. Contrast, saturation and vibrance can normally be adjusted in photo editing programs.
There are many elements in photography that come together to make an image be considered “good”. Elements like lighting, the rule of thirds, lines, shapes, texture, patterns, and color all work well together to add interest and a great deal of composition in photographs.
In many photos, the lens used is responsible for how they look. A telephoto lets you get super close to any action, wide-angle lenses let you show off a whole location, and portrait lenses blur out a background—that's something that your smartphone can only do with digital trickery.
A good photographer is passionate about photography and willing to learn and improve continuously. Acquiring technical skills is just the beginning. A good photographer also needs an artistic vision and storytelling skills. All these take time to develop, but they will become your second nature soon.
For a studio portrait photographer, it's likely all about skill. For a sports photographer, it's probably both. For a photojournalist, it's probably mostly talent.
Tips To Boost Your Photography Skills
Camera Basics
If you want to shoot better photos right away, it helps you understand your camera's controls. Here are some camera basics that all beginner photographers need to know before starting to shoot.
The aperture of a camera is the opening in the lens through which light enters; it also affects the depth of field. With a wider aperture, more light enters the camera, but the depth of field is also reduced. Since the depth of field increases with decreasing light entering the camera through a smaller aperture, narrower apertures are preferable for shooting in low light.
The shutter speed controls how long the shutter is open, allowing light to reach the camera's sensor. A faster shutter speed means less light enters the camera during the exposure. Shutter speeds that are too slow allow in more light but blur the image. In this tutorial, you'll learn how to employ shutter speed imaginatively to create striking photographs.
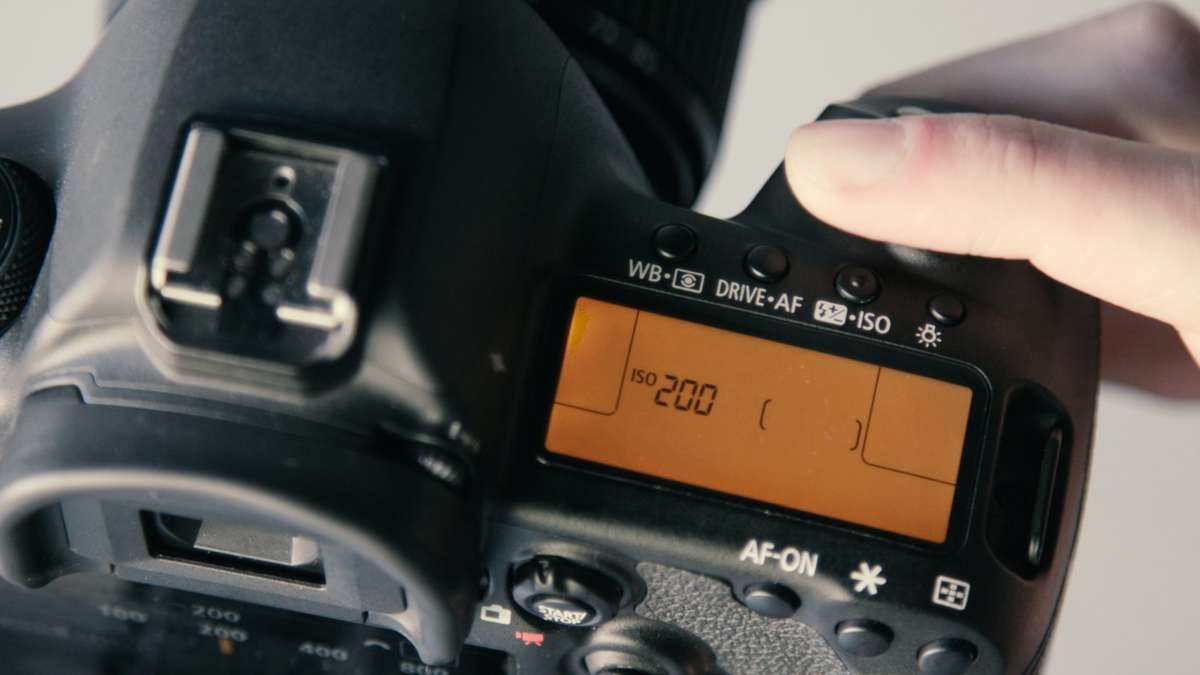
ISO refers to how light-sensitive your camera's sensor is. Changing the ISO setting can adjust the camera's sensitivity to light. It is crucial to carefully select your ISO settings, as high ISO settings can cause unwanted noise in your photographs. The information presented here will help you better understand ISO.
The amount of light that reaches your camera's sensor determines the exposure. The brightness or darkness of an image is determined by the exposure, which is influenced by the aperture, shutter speed, and ISO settings. The exposure triangle, the rule of equivalent exposure, and the law of reciprocity provide further insight into exposure control. Using the Exposure Triangle, you can see how exposure, shutter speed, and ISO interact to produce the desired effect.
The histogram displays the image's tonal values graphically. It's useful for ensuring that your photographs are properly exposed. Examine the reading, histogram exposure, and histogram restrictions to learn more about the histogram's capabilities and how to utilise them best.
Gaining a clear image in your camera's sensor is accomplished by focusing on a certain point. You can adjust the focus to either the autofocus or the manual focus. After you've mastered autofocus, many styles of photography still benefit from having a firm grasp on manual focus. Here you will find information regarding the autofocus features of the camera.
Use a zoom lens or physically approach your topic to achieve a closer perspective. Only zoom lenses include the ability to "zoom in," which makes the subject or scene appear closer than it is.
The camera's mode dial can be used to choose between a number of different shooting modes. It is important to select the appropriate shooting mode according to the scene's subject matter and lighting conditions. Explore the camera's mode settings and familiarise yourself with its different preset options.
When learning photography, one of the most crucial skills to acquire is understanding the several metering settings available to get the desired exposure in a wide range of lighting conditions. Read this article for additional information on the many types of metering.
Whether you prefer to shoot in raw or Jpeg means you'll need extra memory cards for your shoot. Raw files are large in comparison to jpegs, but they have the advantage of being uncompressed and packed with so much data that you can recover as much information as possible during post-processing.
Composition
You don't need a camera to master photography's underlying technique of composition. But since nearly everyone on Earth now has a camera or smartphone, that's where we'll begin.
The positioning of the subject (or focus of interest) and other elements makes for good composition since it directs and aids the viewer in making sense of the shot.
Many compositional guidelines must be mastered. Artistic expression is not contingent upon adhering to any particular guidelines, yet a working familiarity with such guidelines is necessary for producing anything worthwhile. At Vines of the Yarra Valley we have compiled a list of the Best Photographers in Melbourne to help you choose who captures your magical day.
If you're just starting with composing, some fundamental guidelines include the following:
The Rule of Thirds
The name itself captures the simplicity of the concept. The picture is divided into thirds, both horizontally and vertically. What we're interested in are the intersections between the two lines. Assuming you're taking a portrait, you should align the subject's eyes with one of the intersections, preferably the upper ones.
When photographing landscapes, however, you should use the rule of thirds to visually divide the scene into sky and ground and then position your subject (the sun, in this case) at one of the intersections.
The grid can be activated on DSLRs and Mirrorless systems, but even cellphones can show it as an overlay to help you frame your shots until you get used to it.
Symmetry Within Your Composition
If you don't like using the rule of thirds for a particular composition, the symmetrical composition may be more your style. The symmetrical composition, however, is challenging.
The subject should be centred, the lighting should draw the viewer's attention, and the lines should be straight and symmetrical. It requires a keen eye for detail and a willingness to adjust to the idea that your frame should be perfectly square.
Both methods work well together because they can be aligned using the rule of thirds for symmetry.
Guiding (or Leading) Lines
The rule of thirds and the symmetrical method can be utilised in tandem with this guideline. The purpose of compositional lines (whether actual or faked with light and trickery) is to direct the viewer's attention to the focal point of a photograph.
Both landscape and portraiture are affected by this (to choose two contrasting photography interests).
However, it needs to be subtle in portraiture and direct in the landscape. While it's possible to stray from the norm, doing so requires caution. The lines' purpose is to direct the viewer's eyes to the subject, not detract from it.
Selective Focus
Although this is more difficult to do with a smartphone camera, you may still give it a go by bringing the subject into sharper focus (i.e. performing a macro shot with your smartphone).
However, this is a breeze when using a DSLR camera. With selective focus, the foreground and background of an image become blurry, drawing the viewer's attention to the subject of sharp focus.
On the other hand, the elements outside the depth of field should be ornamental and visually appealing without being in the way. If this is the case, the placement of the topic within the frame may need to be adjusted.
The Light
There would be no photography without light. Light is the essence of photography, so without it, there can be no picture. While the quantity of light is important, quality and placement are crucial.
The purpose of lighting is to make an image more three-dimensional, make it more visually appealing, and highlight specific details.
Shooting Angle
When taking portraits, it's best to position the light at an angle rather than from above. Due to this, most photographers will not take a portrait during the middle of the day.
Unfortunately, the position of the sun results in unflattering shadows. The same is true of landscapes; the image lacks depth when lighted uniformly with strong shadows.
In terms of simplicity, the "Rembrandt" style of light is the best for portraiture. It's simple since you only need one light source, and you don't have to do much softening to that one light source. The result is almost always to the satisfaction of the person experimenting.
Diffusion
On a picture, however, only two dimensions (unlike the three-dimensional vision humans have), additional tricks are required to create the illusion of depth.
Strong illumination emphasises the flatness of the image, making it resemble a drawing rather than a photograph.
A lack of tonal variations in the shadows creates a comic-book effect when combined with bright light. It is not a bad thing to have to happened. On the other hand, portraits look more natural and appealing when lit with a softer light that adds depth.
Colour Temperature
By now, you've probably realised that not all illumination is the same. Since various types of lighting have varying colour temperatures, failing to properly white balance a picture can cause it to appear excessively cool (blue) or warm (orange) or skewed (magenta, green) in tone.
Use the Tripod When Necessary
When the illumination is poor, or the subject is far away, hand-holding a camera is not an option. You can't always hand-hold your camera when you wish to utilise a shutter speed that's slower than what you're able to achieve. Water and cloud features, the night sky, close-ups of flowers, etc., all lend themselves well to long-exposure photography. Using a tripod, you may take pictures with several seconds to minutes exposure times. When using a tripod, you should disable image stabilisation.
How to Photograph?
An essential step in mastering your camera's settings, buttons, and menus is reading the manual that came with it.
For better results in your landscape and night sky photographs, learn to scout the locations before you shoot. The same holds for landscape or architectural photographs taken in natural light.
Looking for a wedding photographer in Melbourne? Look no further. Vines of the Yarra Valley has compiled an ultimate list of wedding photo companies to help you choose.
Then, once you've settled on a location, you may frame your shot and scout out the ideal light. Take note of the light's directional qualities and intensity as you arrange the elements in your composition. Experiment with a variety of compositional elements, such as changing the aperture, shutter speed (for long exposure images), viewpoint, and focal length. Spend some time arranging your shot, and don't rush.
Conclusion
The ability to take professional images brings up a world of opportunities. The more expert your images look, the more impressive your online photography portfolio will be. You may greatly improve your photography skills by learning to take advantage of your DSLR's many capabilities. This DSLR cheat sheet is useful for beginners or as a refresher, and there is a lot of helpful information to be found in these sites. The exposure of your photo is dependent on how much light reaches the camera's sensor.
Adjusting the camera's ISO setting modifies its light sensitivity. The Exposure Triangle illustrates the interplay between exposure, shutter speed, and ISO in achieving a certain result. Depending on the nature of the shot and the available light, a certain shooting mode should be used. Good composition results from the strategic placement of the subject and supporting pieces, which guides the eye and clarifies the context of the photo. Compositional lines (whether real or fabricated with light and deception) help draw the eye to the subject of a photograph.
Although creative freedom does not depend on following strict rules, a working knowledge of such rules is essential for producing quality work. The absence of light renders any photographic endeavour futile. It's not just about how much light there is, but how well it's distributed. Adding depth, aesthetic value, and emphasis to an image are all goals of lighting design. To get the most flattering results from portrait photography, light should be placed at an angle rather than coming straight down from above.
Focusing on the finer details of your camera's settings, buttons, and menus, as well as the instructions provided, is essential for any photographer. You may capture images with exposure times of several seconds to minutes by using a tripod. As you arrange the components of your composition, keep in mind the light's directional properties and intensity. Change the aperture, the shutter speed (for long exposure photographs), and the viewpoint to see what happens.
Content Summary
- Taking a beautiful photograph requires a lot of planning, from selecting the right subject to composing an appealing image to finding the best possible lighting.
- If you can learn and use even a subset of these core techniques employed by the experts, your performance should improve dramatically.
- There are several benefits to learning how to take professional images.
- The more expert your images look, the more impressive your online photography portfolio will be.
- Whether you're aiming for a career in photography or you simply enjoy taking pictures for fun, honing your photographic skills will serve you well in the creative industries of design and illustration.
- Focus, composition, white balance, and lighting are all essential aspects of photography, and this guide will help you master them and break bad habits.
- You may greatly improve your photography skills by learning to take advantage of your DSLR's many capabilities.
- This DSLR cheat sheet is useful for beginners or as a reminder for more experienced photographers and is included in these photography resources.
- Understanding your camera's settings is essential if you want to start taking great photographs straight now.
- Before picking up a camera for the first time, here are a few fundamentals every newbie should grasp.
- A camera's aperture is the lens opening size that allows light in; this value also impacts the depth of field.
- The shutter speed determines the length of time that the shutter is open, and thus how much light reaches the camera's sensor.
- Increasing the shutter speed means less light enters the camera during exposure.
- Adjusting the camera's ISO setting modifies its light sensitivity.
- This material will assist you in developing a deeper comprehension of ISO.
- The exposure of your photo is dependent on how much light reaches the camera's sensor.
- Exposure, which is affected by aperture, shutter speed, and ISO, determines how light or dark an image is.
- Further understanding of exposure control can be gained through the exposure triangle, the rule of equivalent exposure, and the law of reciprocity.
- The Exposure Triangle illustrates the interplay between exposure, shutter speed, and ISO in achieving a certain result.
- Make sure your photos have the right amount of light by using this tool.
- To further understand the histogram and how to use it, one should look at the reading, the histogram exposure, and the histogram limits.
- Focusing allows you to achieve a sharp image on your camera's sensor.
- The focus can be set to either autofocus or manually.
- The camera's autofocus capabilities are described in this section.
- To get a closer look at your subject, use a zoom lens or move in closer.
- Using the camera's mode dial, you can choose between several photographic settings.
- Depending on the nature of the shot and the available light, a certain shooting mode should be used.
- You will need additional memory cards for the shoot regardless of whether you shoot in raw or Jpeg.
- Composition, the underlying method of photography, can be mastered without the use of a camera.
- A well-composed photograph directs and supports the viewer in making sense of the photograph by strategically placing the subject (or focus of interest) and other features.
- Because of its straightforwardness, the concept is reflected in the name.
- Horizontally and vertically, the image is split into thirds.
- If you're taking a portrait, your subject's eyes should be aimed at one of the crossings, preferably the ones in the upper third of the frame.
- However, the rule of thirds can help you compose stunning landscape photos by forcing you to mentally separate the sky from the
- ground so that you can place your subject (the sun) at one of the intersections.
- You can use a symmetrical composition instead of the rule of thirds if you choose.
- Even still, the symmetrical composition presents certain difficulties.
- Straight and symmetrical lines, a centred subject, and attention-grabbing lighting are all essential elements of a well-composed photograph.
- You must have a good sense of detail and be willing to adapt to the idea that your frame must be square.
- Because of the symmetry provided by the rule of thirds, the two approaches go hand in hand quite nicely.
- This has implications for both landscape and portraiture (to choose two contrasting photography interests).
- However, it must be indirect when depicting people and bold when depicting landscapes.
- You may try this, but it will be more challenging with a smartphone camera by focusing in on the topic (i.e. performing a macro shot with your smartphone).
- However, with a DSLR camera, this is a breeze.
- Using selective focus, you may emphasise a specific part of an image while blurring the rest.
- Contrarily, anything lies beyond the plane of focus should function purely as decoration, adding aesthetic appeal without interfering with the scene.
- If that's the case, the context of the subject might need to be shifted.
- Without illumination, photography would be impossible.
- The absence of light renders any photographic endeavour futile.
- It's not just about how much light there is, but how well it's distributed.
- Lighting's main goals are to enhance an image's aesthetic appeal and draw attention to key elements within the scene.
- Anisotropic Distortion of the Image Caused by a Change in
- To get the most flattering results from portrait photography, light should be placed at an angle rather than coming straight down from above.
- We get unfavourable shadows because of the sun's location.
- When landscapes are lit uniformly with strong shadows, the image loses depth.
- The "Rembrandt" lamp is ideal for portraiture because of its simplicity.
- One light source is all that's required, and there's not much softening work to be done on that one source.
- However, since a picture has only two dimensions (unlike the three-dimensional vision people possess), special effects are needed to give the impression of depth.
- The flatness of the image is accentuated by the strong lighting, which makes it look more like a drawing than a photograph.
- You have undoubtedly figured out by now that not all light is created equal.
- Since different sources of light have different colour temperatures, improper white balancing can cause an image to look unnaturally cool (blue), warm (orange), or skewed (magenta, green).
- Holding a camera by its handle is impractical when the light is low or the subject is far away.
- If you want to use a shutter speed slower than you can realistically achieve when hand-holding your camera, you'll need to find another method.
- Those situations are ideal for long-exposure photographs.
- Using a tripod, you may capture images with exposure times of several seconds to minutes.
- Turn off picture stabilisation when using a tripod.
- Reading the instructions with your camera is a crucial first step in becoming proficient with all of its features.
- The quality of your images of the environment and the night sky will improve if you take the time to scout the spots in advance.
- Natural-light images of landscapes or buildings work the same way.
- After deciding on a spot, you can set up your photo and look for good lighting.
- As you arrange the components of your composition, keep in mind the light's directional properties and intensity.
- Change up your aperture, shutter speed (for long exposure shots), viewpoint, and focal length to see what works best for your composition.
- Take your time setting up the photo, and don't be in a hurry.