Making your own wedding invites is certainly something you've considered if you're in the midst of wedding preparation. After all, do-it-yourself projects are all the rage nowadays, and everybody knows that DIY has great benefits like cost savings and special-occasion invitations. Looking for a Wedding Event Planner? Look no further, Vines of the Yarra Valley have you covered.
However, the benefits aren't the only thing to consider while selecting whether or not to send invitations. DIY invitations are excellent, but they aren't for everyone. DIY may save you time and energy, and we'll help you decide if it's a good option for you.
Table of Contents
FAQs About Wedding Invitations
Printing your own invitations may be more affordable than having them printed by a pro, but it doesn't always mean it will be faster. Be sure to give yourself time, grace, and patience when printing at home, because it can get a little complicated.
Invitation card will help you maintain friendships and build a stronger connection between you and people who you would like to know. Since Invitation card will show that you care about that person and see them as the important people, it can also give you some work opportunity that you might look for in the future.
How many guests are typically invited to each size wedding? These numbers may vary a little depending on who you're speaking with, but a small wedding typically includes 50 people or under, a medium wedding has a guest list of anywhere from 50-150 guests, and a large wedding has over 150 attendees.
The average number of day guests hasn't moved much over the years from the 80 to 85 people mark and you'll find planners, venues, caterers etc, will work within 80-100 people as their benchmark for an “average” wedding.
The wedding invitation is one of the most important things to focus on during your wedding planning. They offer the guests a sample of what type of wedding you're having (formal or casual), and they list critical information to make sure people know where to go and what time to be there.
Making Your Wedding Invitations
Wedding invitations can be handmade for a variety of reasons. Whether you're trying to save money, add a personal touch, enjoy handwriting, don't want to shop around, or all of the above, making your own wedding invites is an elegant option. But is there more to them than that? The weeks and months leading up to a wedding are sometimes extremely stressful for the majority of the population.
What if there was a way to achieve that handmade taste without really making anything from scratch? When something seems too good to be true, it usually is.
How to Make Wedding Invitations? Design Your Wedding Invitations
Which wedding invitation option appeals to you more: making them online or printing them at home? There's nothing quite like that special touch of having designed your own wedding invites, but you may be wondering if you have the time or money to do so.
The process of making your own wedding invites can be a lot of fun, but it's important to know what you're getting into before you start. Building a design from scratch and then having it printed on high-quality paper and ink is no easy task.
Websites that promise to "make your wedding invites free" or provide you with custom invitations for pennies on the dollar are likely to be misleading. Be wary of sketchy websites that steal the designs of others for financial gain or that have extra fees you wouldn't notice until you read the fine print. If something is too good to be true, chances are it probably is.
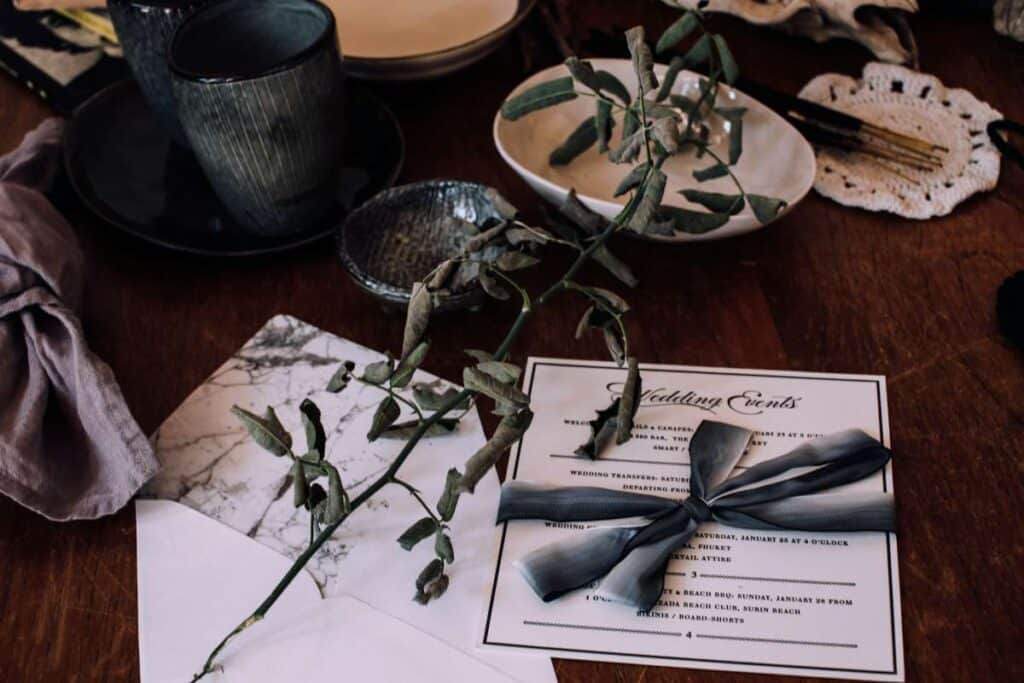
Those who want their invitations to stand out from the crowd can do so by selecting cards from a variety of design options. Wedding invitations with a multilayered design can be sent in a single envelope or held together with a belly band.
How to Make Wedding Invitations?
Do you want your wedding invitations to have that beautiful, handmade look? No one wants their wedding invitations or announcements to seem like they were stamped out in a factory. We're all on the lookout for a sophisticated and one-of-a-kind reflection of ourselves. You might find alternatives to handmade invites for weddings.
Wedding invitations with a calligraphy-style font or invitations hand-drawn by a designer and printed digitally on stunning high-quality paper are available to you through a quick internet search. Rather than taking the risk of sketching your own designs and hoping for the best, you should choose one that already exists. Relax and try your hand at a more creative approach.
If you want to go with our printed invites, you can still get the illusion of a hand-drawn invitation by addressing each envelope individually. Gather your workforce, set out the refreshments, and get to work! Make an evening out of it, why not? After the cramps in your hands have subsided, the memories of the shared laughter and camaraderie will remain.
Do you fancy yourself artistic? If so, maybe you could try making your own wedding invites. Create something unique and have it printed.
I Can't Be Bothered Shopping Around.
Yeah, we understand it. Your pre-wedding schedule is already jam-packed, and you just don't have the time or energy to go hopping from store to store in search of wedding stationery.
Instead of stressing out over printing your wedding invites, why not do some online browsing from the convenience of your own home? Making your wedding invitations is a laborious process that can take longer than simply shopping around. Making your own wedding invitations for free online sounds like a wonderful opportunity, but the simple words "create your own" connote a great deal of hassle.
What If I'm on a Budget?
If you've been thinking about print-at-home wedding invites but are nervous about tackling a DIY project for your big day, you may always go for an alternative. You can avoid weeks of stress by sending out free online wedding invites. But that doesn't mean you have to limit yourself to virtual invites for your wedding (we personally think virtual invites can't compare to traditional paper invites, what do you think?!).
Print, your wedding invites kits can appear to be substantial at first, and while they can work out beautifully, make sure you realise what you're getting into before you plunge in. It is important to learn what sort of printer (and how much ink) is needed to print these drawings properly. Estimate how many additional cards, such as response cards, menus, and an order of service, will need to be printed in addition to the invites.
Do you want to continue the coordinated look by ordering your thank you cards at the same time? That's a lot of ink if it is. Watching a video tutorial on how to print your wedding invitations could be helpful before you start. Consider whether you still want to attempt the project on your own after you've gathered more information.
Pros and Cons of DIY
Consider Savings (or Potential Lack Of)
Saving money is a popular justification given by engaged couples for producing their own wedding invitations. Understandably, in these financially trying times, you might spend less money on the invitations and more on the actual wedding.
If cost-cutting is the only factor influencing your decision to DIY, you should know that your savings will eventually dwindle. Check out our ultimate list of Wedding Planners in Melbourne to help you organise a stress-free wedding.
Why Does DIY Usually Save?
Making your own invites allows you to save money over buying them already produced because you only have to buy the supplies you need instead of having to pay for the time and expertise of a professional graphic designer, printer, and assembler.
Why Does DIY Sometimes Not Save?
You will need all the materials, not only paper and envelopes, to make your invites. A better grade printer or specialised cutting, scoring, and embossing tools may be necessary to implement your design, adding significant costs that may ultimately negate any potential cost savings.
Compare Similar DIY and Ready-Made Designs.
Are Savings Significant?
You may calculate how much money you will save by making your own invitations by adding up all the expenses associated with your design and then comparing them to the cost of a similar premade invitation.
Expenses may result from:
- Productive Stuff - (paper, envelopes, embellishments)
- Possible equipment - (scissors, rulers, embossers, stamps, etc.)
- Replacement printing equipment and supplies
Is it worthwhile when you total up everything you'll save by doing it yourself? The answer lies there.
Consider Time (DIY Invites Take a Lot of It)
DIY invitations are time-consuming and costly, as the old adage goes. Ask yourself, "Do I have the time to juggle job, wedding preparation, friends and family, and DIY invitations?" before making any final decisions.
Taking on another task may not be the best choice if you're already stretched thin. Your invitations should not be completed under pressure or haste. The point of DIY is to have a good time, after all.
Consider All That DIY Entails
You may be wondering, "Why does it take so long to make your invitations?" Find out what has to be done, from brainstorming to sending invitations in the mail, 6-8 weeks before the big day, by checking off the items on this checklist.
Gather Design Ideas
The internet is a treasure trove of design resources; even if you already have an idea in mind, you should look around on various forums, blogs, and social media for some fresh perspectives.
Experiment
Get samples of speciality papers, envelopes, and embellishments to try out after brainstorming potential designs.
Test Print
It's not possible to print on every type of paper. To fully evaluate your home printer's capabilities, it is suggested that you acquire sample sheets in a variety of weights.
List of Things to Do When Making Your Invitations
Despite the fact that the actual printing process shouldn't take too long, extra time should be allotted for possible mistakes. Ink cartridges can dry up, words can smudge, and paper can jam, so it's always a good idea to have a backup on hand and some buffer time in case of printing disasters.
Assemble
The assembling of the invitations could take the longest. You may need some more time to layer, wrap, adorn, etc. if your design calls for it. It's also your job to neatly package each ensemble in an envelope. You should probably not expect to finish this in one sitting without outside assistance, so plan accordingly.
Take a Trip to the Post Office
Once all of the invites are finished, take one complete set to the post office to get an estimate on postage. It would be a shame if your invitations were returned to you because of insufficient postage. The RSVPs should be postmarked as well.
Take Another Trip to the Post Office
Return to the post office to drop off your invitations once you've had them all stamped. In order to prevent invitations from being mangled by fast machinery, we advise cancelling them by hand.
Consider Your Creative Ability
Create something truly unique by designing your own invitations, and reap the benefits of total creative freedom. In contrast to the limited selection of pre-made invites, the only limits on DIY invitations are your creativity, budget, and time.
It is important, to be honest with yourself about the amount of time, money, and effort you can devote to your invitations before you even start.
If you are making an honest effort, your invitations will probably be fantastic. The invitation you envision and the invitation you create may be very different if you're aiming for a design beyond your budget or skill level. This is the phenomenon of expecting "champagne flavour on a beer budget," which is unacceptable.
Making Your Own Wedding Invites: Tips & Advice
Carry Out Some Research
As a first step, try searching online for examples of wedding invitations to get ideas.
Retail Maven
You can find customised cardstock that will work for your purposes at art supply shops and unique boutiques. If you need to purchase newspapers, you may want to look into doing it online since here is where you will discover the best bargains and coupons, many of which will not be accessible in physical stores. You can customise the colour of the invitation's back by purchasing multicoloured paper in the desired hue and trimming it to fit the size of the envelopes you plan on using.
Find Superb Resources
A decent paper cutter will come in handy if you want to make your own wedding invitations. In the absence of your own, copy shops are a good place to find one to utilise. You may even go to your neighbourhood craft shop and pick one up there! Prior to placing an order, compare shipping rates to ensure that the total price is within your financial constraints.
Arrangement and Design
Prepare your invitation text so that it will accommodate one page that is 12” to 1′′ smaller in width and length than those huge sheets of card stock. (Your cardstock pieces might be 5 inches by 7 inches, while your regular paper might be 4 inches by 6 inches.) When you're satisfied with the design, print off a sample invitation and trim it to size. You need to visualise how the final result will look.
Printing Your Invitations
The use of a simple inkjet or laser printer makes it possible for you to create your own wedding invitations at home. Simply stock up on ink to be safe!
Easy and Inexpensive DIY Ideas to Make Your Wedding Invitations Stand Out
In order to pull off a spectacular wedding, you need to pay close attention to the finer aspects, beginning with the invitations. Your wedding invitations will be sure to impress your guests if you take the time to add a few special touches to them.
Purchase a Custom Stamp
You can personalise your wedding invitations or add a return address to the envelopes with a custom stamp. Rubber stamps of any design can be easily ordered online.
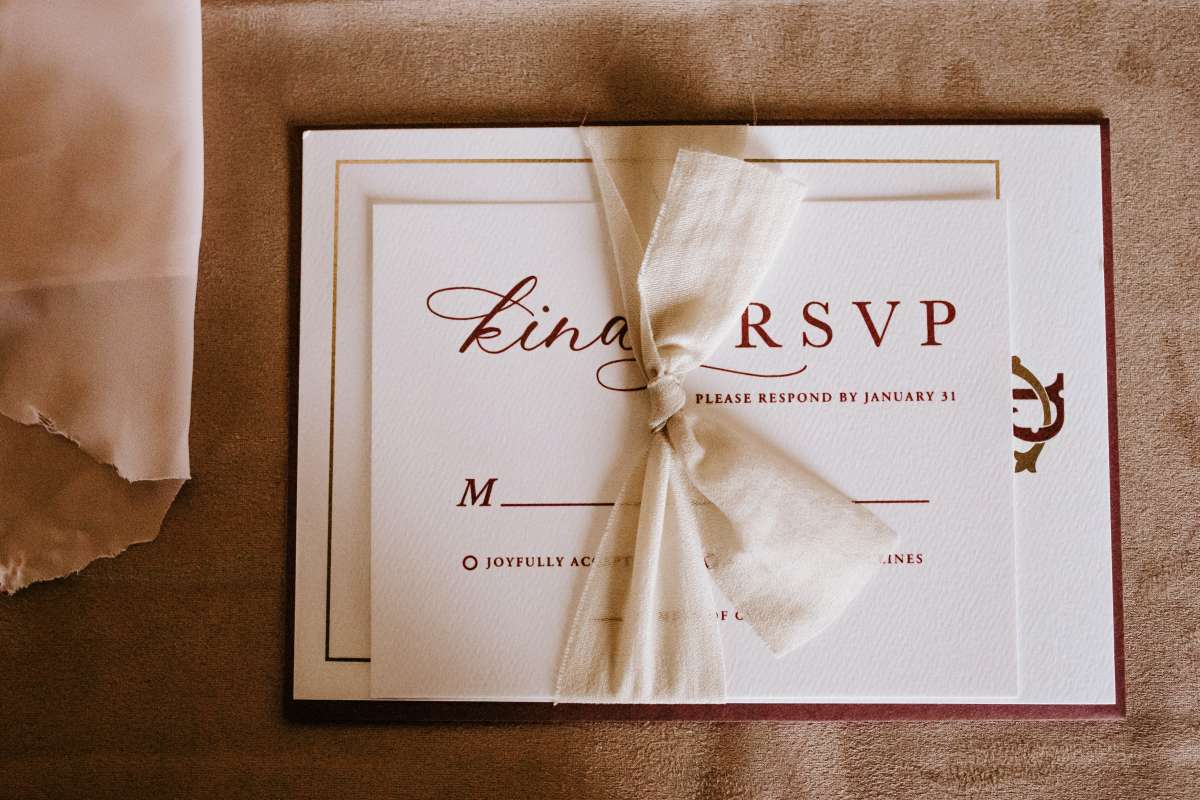
Fasten a Bow on It
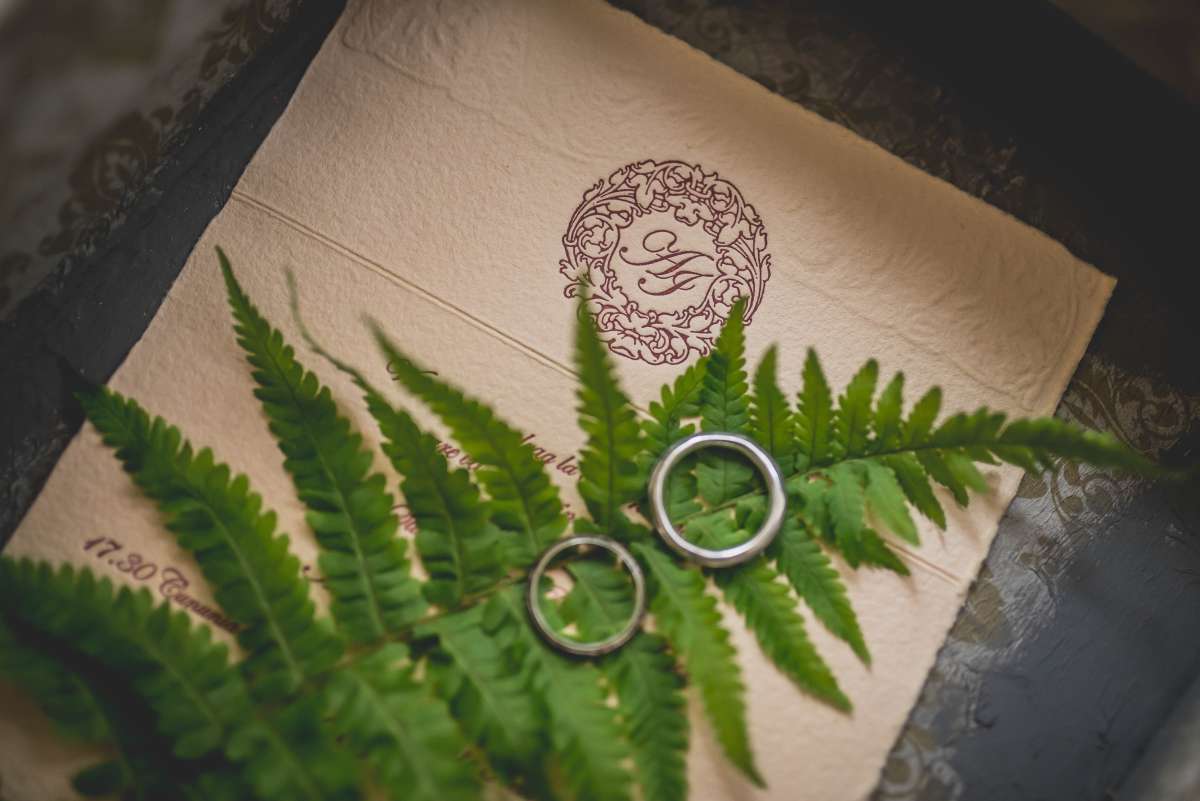
The addition of a bow to your wedding invitation is a beautiful finishing touch that will help your guests maintain track of the additional materials you've included (such as directions, RSVPs, and gift registry information). Add a tag for a touch of elegance.
Punching Out Some Creativity
Create beautifully contoured edges and corners on your wedding invitations with the help of a specialised stamp cutter or punch. They come in various shapes and sizes and may be purchased from various sources, including craft stores and online. You just need some time, a decent desk, and a firm grip (don't use it when you're tired) to use it well.
Use Elegant Calligraphy for Your Invitation Addresses
You can make your invitations stand out even if it's been years since you took cursive writing in school by beginning with a proper address. Take a lesson or read a guide to learn how to write better calligraphy at your own pace. Put your new skills to use by composing elegant invites and addressing envelopes.
Toss in a Watercolour Wash
To replicate the sophisticated stationery you find on Pinterest, you only need to make some simple wedding invitations and print them out on watercolour paper. To give them an elegant event vibe, decorate them with a wonderful watercolour wash. Watercolour can distort the form if applied too thickly. More practice is required, as is usually the case.
Add a Bit of Gold Leafing
Putting a bit of glitz with gold edging on your invites or envelopes is an easy way to make plain white invitations seem very expensive. Nothing too strenuous is required.
Tag and String It Up
Add some personal flair to your rustic wedding invites by attaching a handmade kraft paper tag with twine. Similar to a ribbon, it serves to keep the envelope's contents in place.
Include a Blank Envelope Liner
One cannot help but feel happy when opening an envelope to see the beautiful lining. The internet is rife with how-to manuals and videos.
Utilise an Embosser
A personalised embosser may take plain envelopes to the next level. Your company will appreciate the subtle elegance. It seems valuable, but no one except you will know the truth.
Wax It Shut
Wax seals on wedding invitation envelopes are the epitome of old-world elegance. Etsy and specialised paper and craft stores are good places to look for these. Take some time to perfect your technique before attempting to wax a hundred on the conveyor belt at once; an excess of Wax can make for an unsightly mess. You can breeze through them if you put in the effort to perform a good job.
Has it All Covered? Then DIY Is for You!
If you feel DIY will save you money and have the time and resources to create the look you're after, DIY is a good choice for you. You'll have a wonderful time creating your invitations, and they'll turn out beautifully. Looking for a Wedding Event Planner? Look no further, Vines of the Yarra Valley have you covered.
Conclusion
The reasons for making your own wedding invites are varied. Crafting your own invitations can be a lot of fun, but it's not for everyone. Building a design from scratch and then having it printed on high-quality paper and ink is no easy undertaking. Avoid dubious websites that blatantly take the work of others. Digital printing on premium paper allows for the printing of calligraphy-style wedding invites or designer-drawn invitations.
Rather than scribbling out your own ideas and crossing your fingers, you should pick one that has already been created. Creating your own wedding invitations is a time-consuming procedure that may easily eclipse the time spent searching for the perfect ones. Understanding what kind of printer (and how much ink) is required to print these pictures accurately is crucial. Calculate how many response cards, menus, and an order of service will be needed. A wedding invitation printing video instruction might come in handy before you get started.
DIY invitations, as the old adage goes, are both time-consuming and expensive. It's important to ask yourself, "Do I have the time to combine wedding planning, friends and family, and DIY invitations?" before making any final decisions. Discover what has to be done by going down this checklist item by item, from coming up with ideas to putting everything together. DIY invitations are only restricted by the host's imagination, finances, and availability. Artist supply stores and speciality boutiques are good places to look for the specialised cardstock you need.
You should check the shipping costs of multiple vendors before placing an order to be sure you can afford it. How to Make Your Wedding Invitations Stand Out on a Budget and with Little Effort DIY wedding invitations are easy to prepare with just a computer and an inkjet or laser printer. Use a specialised stamp cutter or punch to make neatly rounded corners and other edge treatments. Attaching a homemade kraft paper tag with string will give your rustic wedding invitations a special touch.
Adding a personal touch with an embosser may elevate even the most ordinary envelope. If you want to save money and have the time to do it yourself, then DIY is the way to go.
Content Summary
- If you're in the middle of planning a wedding, you've probably thought about making your own invitations.
- When deciding whether or not to send invitations, benefits should not be the only factor considered.
- Crafting your own invitations can be a lot of fun, but it's not for everyone.
- The reasons for making your own wedding invites are varied.
- The decision to make your own wedding invitations is a classy one for a number of reasons, including cost savings, the ability to add a personal touch, the satisfaction of a job well done, the pleasure of handwriting, and the desire to avoid shopping.
- You may be wondering if you have the time or money to create your own wedding invitations, but there is no substitute for having done so.
- Making your own wedding invitations may be a lot of fun, but it's vital to know what you're getting into before you begin.
- It's no simple undertaking to create a design from scratch and then have it printed using high-quality paper and ink.
- It's best to be wary of any website that claims it can "create your wedding invites free" or offer bespoke invitations for next to nothing.
- For those who want their invites to be noticed, there is a wide selection of card designs from which to choose.
- There could be options than handcrafted invitations for weddings.
- Unwind and give your imagination a shot.
- Even if you decide to use our printed invitations, you can give the impression that they were drawn by hand simply by addressing the envelopes one at a time.
- If that's the case, you could try your hand at crafting your own wedding invitations.
- Just think of something original and have it printed.
- Shopping online for wedding invitations may be done without leaving the comfort of your home, relieving some of the stress associated with this important task.
- Creating your own wedding invitations is a time-consuming procedure that may easily eclipse the time spent searching for the perfect ones.
- While the option to make your own wedding invitations for free online is appealing, the phrases "Make your own" connote a great deal of work.
- You can always go with an option if you're considering print-at-home wedding invitations but are concerned about taking on a DIY project for your big day.
- Sending out free internet wedding invitations might save you weeks of hassle.
- You should know what you're getting into if you decide to go with a print, your wedding invites kit, as it may appear substantial at first and while it may work out beautifully, you should know what you're getting into before you delve in.
- Understanding what kind of printer (and how much ink) is required to print these pictures accurately is crucial.
- Determine how many more cards will need to be produced in addition to the invitations, including answer cards, menus, and an order of service.
- Would you like to keep the theme going with matching thank you cards?
- If so, that's a lot of paper to use up.
- Before you get started printing your wedding invites, it might be beneficial to watch a video lesson on how to do so.
- After learning more about the project, you should evaluate if you still want to take it on by yourself.
- Consider the benefits and drawbacks of doing things on your own.
- When asked why they decided to make their own wedding invitations, many engaged couples say they wanted to save money.
- In these tight financial times, it's understandable if you'd rather put that extra money towards the wedding itself rather than the invitations.
- DIY is a good option if you want to save money but realise that your savings will diminish if that's the main motivation.
- DIY's lack of consistent cost-savings is why so many people shy away from it.
- Not only paper and envelopes, but everything else is needed to make your invitations.
- Check out some DIY and premade alternatives that are very similar.
- By tallying up all the costs involved with your design and comparing them to the price of a similar readymade invitation, you can determine how much money you will save by designing your own invitations.
- DIY invitations, as the old adage goes, are both time-consuming and expensive.
- You shouldn't feel rushed or obligated to finish your invitations.
- In the end, having fun is why people engage in DIY projects.
- Get organised 6-8 weeks before the big day by crossing off the things on this checklist, which includes everything from coming up with a theme to mailing out invites.
- Conjure up Concepts
- Even if you already have an idea in mind, you should explore different online communities, blogs, and social media to get new insights.
- Unfortunately, not all paper types can be used for printing.
- Though the printing process itself shouldn't take too long, you should allow for some slack in case of mishaps.
- The time it takes to put together the invites may be the most time-consuming part of the process.
- If your design requires it, you may need extra time to layer, wrap, embellish, etc.
- Each ensemble must be bundled up and placed in an envelope, which is another responsibility of yours.
- When you have completed making your invitations, take one full set to the post office to have them calculate the postage.
- Design your own invitations for an extra dose of freedom to express yourself creatively.
- When making your own invitations, you're only restricted by your imagination, finances, and availability, as opposed to the limited options of store-bought invites.
- Be realistic about how much time, money, and energy you have to put into your invitations before you begin.
- Your invitations will be great, if you are making an honest effort.
- If you have your heart set on an elaborate invitation that's beyond of your price range or creative abilities, the final product may look nothing like what you had in mind.
- Do some digging by looking up wedding invitation samples online.
- Artist supply stores and speciality boutiques are good places to look for the specialised cardstock you need.
- Invitation backs can be made to match the colour scheme of the event by obtaining multicoloured paper in the desired hue and cutting it to the size of the envelopes you intend to use.
- If you want to save money by making your own wedding invites, an effective paper cutter is a must-have.
- Invite guests by preparing a page that is 12" to 1" shorter and wider than the enormous sheets of card material available. (Once you've settled on a layout you like, have a test invitation printed and cut to size.
- Seeing the end result in your mind's eye is essential.
- DIY wedding invitations are easy to prepare with just a computer and an inkjet or laser printer.
- You can avoid potential disaster by simply stockpiling ink.
- It takes careful attention to detail, beginning with the invitations, to pull off a magnificent wedding.
- If you take the time to personalise your wedding invites, you can be sure that your guests will be impressed.
- Create a personalised stamp to give a personal touch to your wedding invites or to use as a return address on the envelopes.
- An elegant touch can be added with a tag.
- Use a specialised stamp cutter or punch to make your wedding invitations stand out with beautifully rounded edges and corners.
- Make use of beautiful calligraphy when addressing invitations.
- Including a proper address at the top of your invites will help them stand out, even if it has been a while since you took cursive writing.
- Learn the art of calligraphy at your own pace with the help of a guidebook or a private instruction.
- The next time you need to send out invitations, use your newfound knowledge to write out some classy notes and address the envelopes.
- You can easily create wedding invites that look like the elegant stationery you see on Pinterest by printing a few simple designs on watercolour paper.
- Add a beautiful watercolour wash on them for a formal event feel.
- Gold edging on invitations or envelopes is a simple method to make otherwise basic cards look elegant and expensive.
- Attaching a homemade kraft paper tag with string will give your rustic wedding invitations a special touch.
- It serves a similar function as a ribbon would in an envelope: holding everything in place.
- No one can help but smile when they open an envelope and see the elegant liner inside.
- An embosser can add a touch of class to otherwise boring envelopes.
- The use of wax sealing on wedding invitation envelopes is the quintessence of classic refinement.
- These can be found on Etsy and in speciality paper and craft stores.
- Before you try to wax a hundred items on the conveyor belt at once, you should practise your technique to avoid making a mess.
- Do it yourself is an excellent option if you want to save money and have the time and resources to put together the appearance you want.
- Your invites, which you will enjoy making, will also look fantastic when finished.