With the ubiquitous accessibility of cameras and the abundance of strong yet consumer editing programmes, it's reasonable to argue that photography is today's most common artistic expression. These reasons have led to a dramatic increase in the number of people who pursue photography as a pastime. But do people who want to become professional photographers need to attend photography school?
Teaching artistic subjects comes with a lot of responsibility and costs. But when many established photographers have problems getting paying gigs, is it necessary to have professional education to compete with millions of pictures already available on platforms like Instagram and Flickr? As a first step, think about why you want to learn these skills.
These days, digital cameras may produce just as high-quality images as those taken with film cameras. These digital camcorders look and act like traditional cameras, but they have some handy improvements. As photographers realise how much easier it is to take pictures, they quickly lose interest in equipment with overly complex designs.
Table of Contents
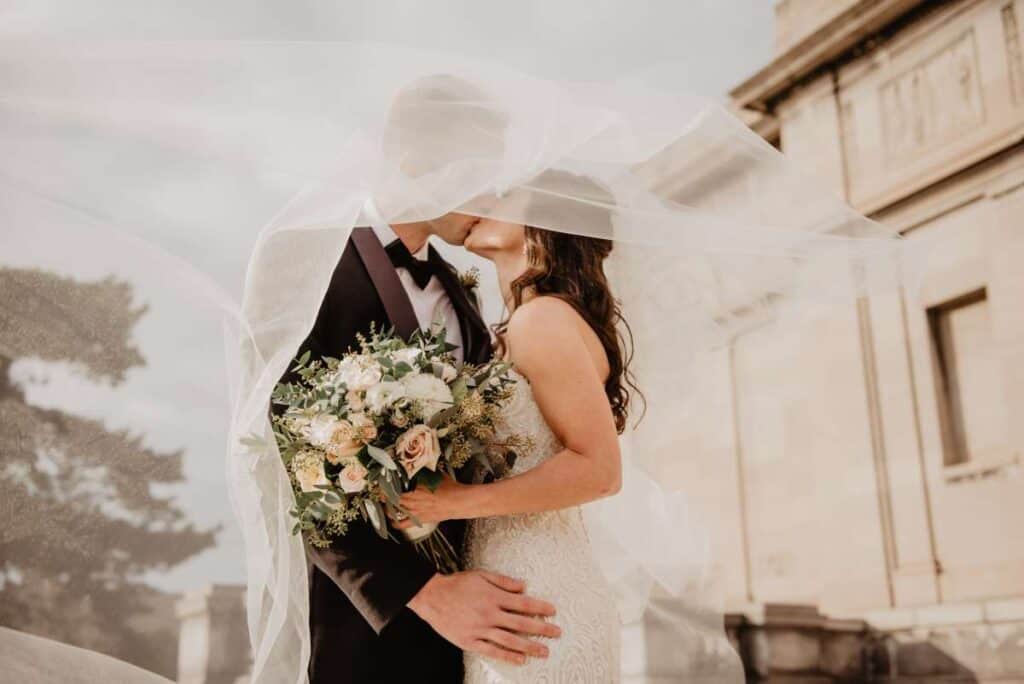
FAQs About Wedding Photography
What is the rule of thirds? The rule of thirds is a composition guideline that places your subject in the left or right third of an image, leaving the other two thirds more open. While there are other forms of composition, the rule of thirds generally leads to compelling and well-composed shots.
But wedding photography is a very challenging job. On any given job, you are a portrait photographer, a documentarian, a still life, commercial and architectural photographer. You have to be practiced in so many areas of photography. And there is no easy secret or shortcut.
Finding time to just be a person, and not a wedding photographer, is really tough. Your relationships with friends and family also tend to suffer, since you're usually not free on Fridays or Saturdays during wedding season. It can be isolating, and downright exhausting to be so consumed by one thing.
A good general rule of thumb is to identify the photo package you'd like to sell the most, and price it at just above the average you need to earn per shoot. In most cases, this is the middle package, where you cover your costs and turn a small profit.
Generally speaking, using the standard rule of thumb is to make the shutter speed equal to your focal length when hand-holding your camera. For example, if you are shooting with a 200mm lens then you want to keep your shutter speed at 1/200 sec or above to avoid any blur occurring from camera shake.

Many aspects of digital cameras are comparable to their film-based analogues, but there are also some significant differences and new developments. Take pictures that would have been impossible with a film camera, all because of these significant improvements.
Following these guidelines will help you capture better pictures with any camera. A tripod is required for shooting with long telephoto and slow camera speeds. For action photography, small depths of field and quick shutter speed are required. It is nevertheless important to put the spotlight on the scene's most vital parts and to use dramatic light when possible. Check out our extensive list of Wedding Photographers in Melbourne to help capture your special moments.
Many expert photographer were wary of digital photography since the word "digital" implies the technology is difficult to master. But consider this: No one who has never used a camera before has taken it up and instinctively knew what each button performed. Although the dedicated photographer had practised these techniques, they were not automatic.
Types of Cameras
There are many varieties of digital cameras available, from entry-level point-and-shoots to sophisticated digital single-lens reflex cameras. There is no "wrong" brand, however some may be more suitable for your particular photographic needs.
It's simple to use; all you have to do is aim and fire. Today's digital cameras have the ability to produce results which may surprise you when they are outfitted using high-quality optics or sensor. The fact that everything you need to do to take a photo with them is click and point contributes to their simplicity. Although even the most basic cameras typically have a white balance setting, they have very little in the way of other image controls. Some are so small they fit in your pocket, making them ideal for trying to ensure you never waste a photoshoot.
The situation is similar to that of contemporary compact cameras. This group of photographers may rely largely on the camera's presets, but they also frequently make use of other, more granular levels of adjustment. Examples of such conveniences include damage compensation, additional white balancing controls, a limited number of manual settings, and so on. Since they are both high-performing and reasonably priced, these cameras are perfect for the homes of photography enthusiasts.
As with their 35mm counterparts, digital SLRs with telephoto lenses provide a broad range of lengths and full manual control. These cameras are obviously much bigger than their digital equivalents. In addition to having state-of-the-art photo sensors & processors, these devices also utilise sophisticated noise reduction techniques. The LCD panel on the rear of a single-lens reflex camera is only useful for reviewing previously acquired images, as the camera's sensor is unable to provide "live" images due to the mirror design.
The Basics of Photography: What Every Novice Needs to Know
It's Important That You Know How to Hold Your Camera Correctly.
This may sound obvious, yet many beginner photographers end up with blurry photographs because they aren't gentle enough with their equipment. Without a question, using a tripod to steady a camera is the most dependable option. Even while you won't need a tripod if you're working with really low light, it's still important to hold the camera steady so that it does not wobble for no reason.
You'll become used to using one hand to hold the camera, but keep both hands ready at all times. In order to steady the camera, put the left hand behind lens with the right hand also on right side.
When the camera is held closer to the body, it is easier to maintain a steady hand. If you can't locate anything to lean on, widening your stance may help you acquire stability, just as leaning vs a wall and heading down on your knees would.
Modify Your Settings to Raw and Begin Shooting Immediately.
In contrast to the reduced Jpeg file, the RAW format keeps all the data that the camera's sensor recorded. If you take your photos in RAW format, you'll have much more flexibility when editing them later. Over or underexposure can be corrected, among other problems, by modifying settings such as temperature, white balance, or contrast.
One disadvantage of shooting with RAW is the greater file sizes that are produced. Since RAW photographs always require post-capture processing, you'll also want to invest in some kind of image editing software.
However, when you have the time and the equipment, shooting in RAW can greatly increase the quality of you photographs. To learn more about switching from jpeg to RAW, consult your camera's manual.
Learn About the "Exposure Triangle"
To easily recall the connection between the crucial three characteristics of exposure—ISO, aperture, and shutter speed—the "exposure triangle" is commonly used. If you want crisp, well-lit photos when shooting manually, you need a good command of apertures, shutter, or ISO.
ISO:
To what extent a camera responds to light is controlled by the ISO setting. Increasing the ISO makes the camera more light-sensitive, while decreasing it makes the camera less sensitive to light. However, if you increase the ISO, the picture may become "noisy" due to the increased sensitivity. Daytime photography is best captured between 100 and 200 ISO. But, a higher ISO 400–800 or more may well be required for photography in low light settings like as indoors or during night.
Aperture:
A lens' aperture controls both the depth of focus and the quantity of light hitting the camera's sensor. When talking about a picture, "depth of field" refers to how far out from the focal point the image remains crisp. At smaller f-numbers, more light is allowed in, but the field of view is also shallower. When the aperture is narrow, depth of field improves at the price of light transmission (a higher f-number). When photographing a group of individuals for instance, a wide lens will allow you to concentrate on a single subject, while a narrow aperture will ensure that everything in the frame is sharp.
Shutter Speed:
The shutter speed determines how long the shutter is open for when taking a shot. In order to capture more light, the shutter needs to be left open for longer. To prevent motion blur, a fast camera speed is necessary to freeze action. When shooting with a slow shutter speed, a tripod is nearly always necessary.
It's Recommended That When Taking Portraits, You Use a Wide Aperture.
The aperture size affects the depth of field, so increasing it will make your subject stand out more in a portrait of the an individual or an animal. Getting rid of extraneous elements in the background can help you zero in on your main subject.
Keep in mind that the effect is magnified as the aperture size increases, and that a bigger f/ value represents a smaller aperture. Although f/1.2 lenses are available, ones with f/5.6 aperture were usually sufficient. Changing the aperture and seeing the results immediately is possible when photography in Aperture Priority Mode (Av or A).
For Landscapes, a Small Aperture Is Ideal.
Taking a landscape photograph is challenging because you need to get everything in focus, from the foreground rocks to the background mountains. Thus, a narrow aperture should be selected when capturing a scene in which sharpness throughout is a priority.
If your lens allows it, shooting at such an aperture of f/22 and higher will produce the deepest depth of field. Again, Aperture Priority Mode allows you to try out different apertures while having to continually fiddle with the shutter speed (Av or A).
Learn to quickly and smoothly toggle between Aperture Priority and Shutter Priority modes.
There are additional choices if you have an appetite to try new things but aren't ready to go fully manual just yet. Without getting too technical, most cameras have a Viewfinder Mode (A or Av) and a Shutter Priority Mode (S or Tv).
When shooting in Viewfinder Mode, the aperture you choose will control the shutter speed instead of the other side around. By allowing the camera to choose the shutter speed and opening the aperture, you may create a portrait with a blurred background.
In Shutter Priority Mode, the shutter speed is adjusted before the aperture is. To get a sharp shot of your dog running towards you, choose a rapid shutter speed and allow the camera decide the aperture.
It's Okay to Use a Higher Iso Setting.
A lot of photographers try to stay away from shooting at high ISOs because they worry about getting grainy or noisy photos. Increasing the ISO usually causes a decline in image quality, but there are exceptions to this rule.
In the absence of a tripod and the ability to utilise a slower shutter speed, it is better to have a sharp picture with certain noise than the no photo at all, as the noise may be edited out in post-processing. In addition, modern cameras can capture high-quality photographs at extremely high ISO values, even up to 6400.
A wider aperture may assist lessen the amount of noise captured in high ISO shots. Slightly overexposing the image also can help, as adjusting the exposure to make the bright areas darker does not result in the addition of noise, whereas adjusting the exposure to get the dark areas brighter does.
Check the ISO Level Before We Start Shooting.
It's annoying under normal circumstances to discover that you've taken a bunch of shots at ISO 800 on a bright summer day, but it's more frustrating if indeed the photos were snapped to remember a once-in-a-lifetime event like a wedding or an anniversary that won't be repeated.
Double-check the ISO setting on your camera before each shoot to ensure clear images. When you're done using the cameras for the day, you can make it a practise to reset them before storing them away.
Avoid Accidents by Being Cautious With the Flashlight.
If you're not careful, using the flash of your camera during night or even in low light could result in red eyes and sharp shadows. Instead of utilising the phone's flash and possibly ruining the photo, it is usually better to increase the ISO to accept noisier photographs.
At other instances, however, you may need to use the camera's flash because there simply isn't enough ambient light. If you are in this situation and don't wish to pass up the chance, you have a few choices. The first step is to adjust the flash settings on your camera to a lower brightness.
Second, use anything to shield the flash from direct sunlight. The brightness can be diffused and softerened by covering the flash with anything opaque, like a sheet of paper or scotch tape. Reflect the light from the ceiling using an angle and a sheet of white cardboard. Looking for the best Wedding Photographer in Melbourne? Check out our ultimate list here.
Figure Out How To Tweak The White Balance
Improve the colour fidelity of your images by adjusting the white balance. Since different light sources have varying quality, so colours of your images may have a slightly bluish, orange, and green tinge if you don't adjust the white balance.
While it's true that white balance can be adjusted in post-production, adjusting it for hundreds of images that all require minute adjustments can get tedious, so it's preferable to get it right inside the camera the very first go around. The white balance settings on your camera probably range from "Auto" to "Daylight," "Cloudy," "Flash," "Shadow," "Fluorescent," and "Tungsten."
Check your camera's handbook if you're unsure about which icons correspond to which functions. White balance is a setting that can be adjusted to suit the lighting conditions; however, automatic white balance may be advantageous in certain situations.
Figure Out How to Read a Histogram
It's tempting to use the camera's LCD screen to see if the photo was exposed correctly, but this isn't always the case. The histogram, a little graph displayed next to your photos, is a great tool for performing a thorough exposure check right in the camera.
It takes a lot of practice to understand how to read the histogram, which displays the tonal range of your image. The graph's left side represents blacks and shadows, while the right side represents whites and highlights.
Overexposure can cause severe data loss in the brighter parts of an image, as seen by a graph that is tilted to the right. An underexposed photograph will appear skewed to the left. Learn more about the histogram and how it can help you analyse data.
Change Your Point of View
Experimenting with a variety of viewpoints might help give your images a more unique feel. Taking a picture from up or down a subject can radically change the atmosphere.
While it's true that not every photo can benefit from a different vantage position, you'll never know who those people can until you give them a chance. Crouching down to an animal's or child's level can allow you to capture more genuine expressions in your photographs. Taking a photo while perched on a bench makes perfect sense.
Grasp the concept of the "Rule of Thirds."
Images that are not centred are more pleasing to the eye and more balanced, according to the rule of thirds. If you were to place a grid over the image you are working with, this would be divided into 10 equal sections.

Using the "rule of thirds," you shouldn't put your topic or the most important components of the scene in the exact centre of the frame, but rather on one of the arcs or even at the points where the lines intersect. Some cameras have a grid feature that might be useful for novice photographers who are still discovering how to frame their images.
But since photo is about individuality and creativity, you can always choose to ignore this rule if you so choose. This is acceptable, but before you start flouting the norm, you should get into the routine of giving careful thought to the attractions and settings you plan to employ.
Maintain Constant Focus With Your Eyes.
Portrait photography requires you to focus your lens's light on an extremely small area, elevating the importance of sharpness. Foregrounding the eyes of a subject is a popular practise in portraiture, especially for close-ups and headshots.
As such, focus on the eyes of the subject. To get sharpness both in eyes, you need just choose one point of focus and point it at one eye. Hold it down your shutter button halfway as long as the first eye is in focus, then reframe the photo to include the other eye.
You Should Think About the Context.
Make the background as simple and uninteresting as possible so that the focus stays where it belongs—on the topic of the photo. Warm colours & plain designs are usually safe bets since you do not want the colourful structure and church tower inside the background to take attention away on your subject.
Changing your angle of view, moving the subject closer to the lens or opening your aperture can help you blur out a distracting background in a photograph. In contrast, if the subject is located off with one side of the image and the environment is clearly visible, you should try to keep it as balanced as possible.
Get Yourself a Good Tripod
If you want sharp photos in low light without having to crank up the ISO, a sturdy tripod is an absolute necessity. When capturing wide landscapes or moving water (such as rivers or waterfalls), time lapse photography, wherein the camera is left open over several seconds and even hours, can provide breathtaking effects.
Before making a first purchase, you should consider the tripod's weight, durability, and height. You should consider the weight of the tripod carefully because you will be moving it about, but it must be able to support the camera as well as any lenses you plan on using. Our Digital Photography School provides an excellent instruction on how to select a tripod for your camera.
Get Some Good Shots of the Morning and Evening Skies.
Most photographers will tell you that the first thing every morning or the final thing at night are the best times of the day to capture your subjects in their best light. In photography, the "golden hour" refers to the time right after sunrise or right before sunset, whenever the sun is at lowest inside the sky and casts the warmest, softest light.
The gentle, golden light of dawn and dusk will provide an aura of serenity to your photographs of landscapes, people, and things. Taking pictures outside during the golden hour isn't necessary, but it does make things easier.
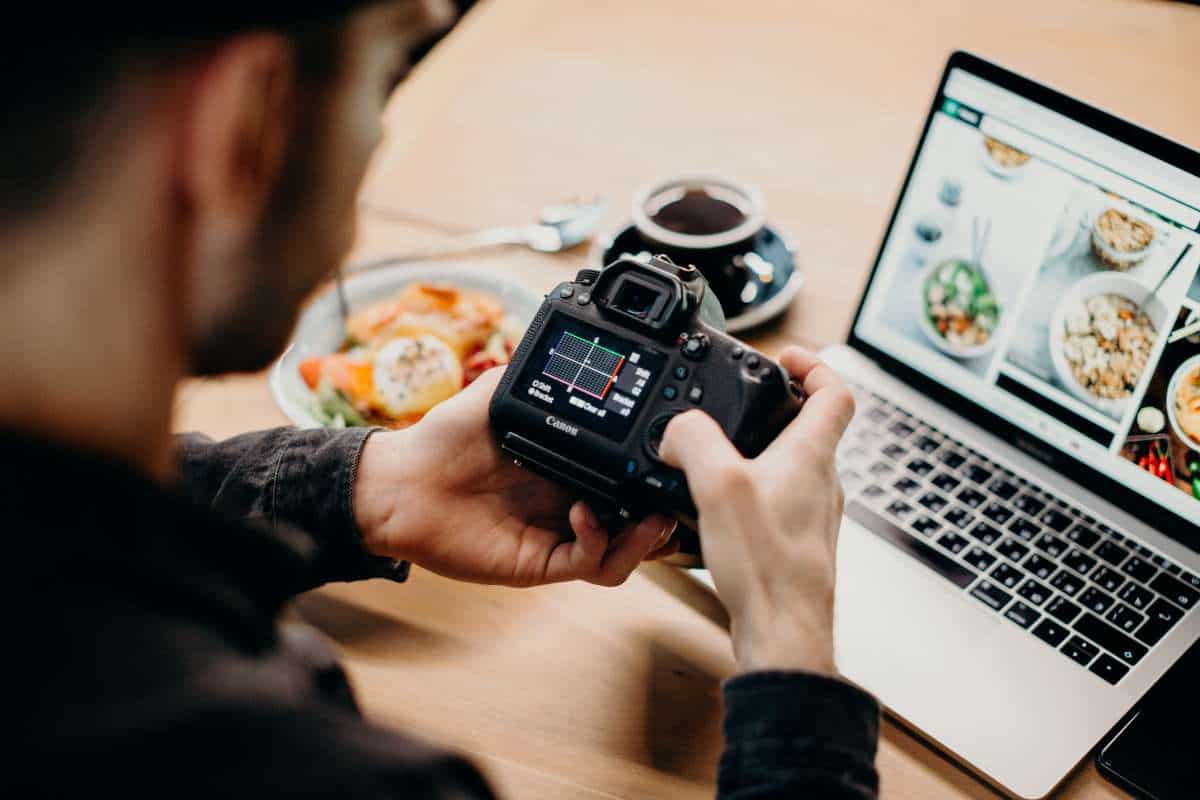
Do Yourself a Favour and Purchase Professional-Quality Photo Editing Software.
Once you switch to shooting in RAW, you'll want to have image editing software handy so you can perform things like cropping, adjusting brightness, white balance, or contrast, or eliminating flaws.
Even though Adobe Photoshop or Lightroom are indeed the gold standards, newcomers may want to try Photoshop Elements, Picasa, and Paint Shop Pro instead.
Be Selective
Take into account the fact that even the most experienced photographers occasionally produce less-than-stellar results. These portfolios are just so impressive because they can not just show you a bunch of average images; instead, they highlight their greatest efforts.
Picking the top few photographs from each shoot is essential if you desire your images to stand out again on social media and photo-sharing platforms such Facebook, Instagram, Flickr, and 500px. While you may have hundreds of photos from an event like a friend's party and your son's football match, only five or ten will really stand out when exhibited all at once.
Make Mistakes and Learn
It's tempting to beat yourself up when your photos turn out blurry, out of focus, or badly composed, but you really should instead learn from your mistakes and use them to become a better photographer. If you take a blurry photo again, instead of deleting it, see if there's any way to fix it. In its place, you should examine the image critically to discover your mistakes and learn from them.
It's possible that adjusting a single setting, like the shutter speed or the composition, will do the trick. Nonetheless, you'll being able to assess your photography's shortcomings and fix them if necessary. Looking for a Wedding Photo Company? Look no further. Vines of the Yarra Valley has compiled an ultimate list of wedding photo companies to help you choose.
Conclusion
These days, most people who dabble in the arts do it through photography. But is formal education in photography required for those who want to a career in the field? Consider your motivations for acquiring these abilities as a first step. It's possible that digital cameras can produce photographs of the same quality as film cameras. If you follow these tips, you may improve the quality of your photos with any camera.
Telephoto lenses for digital single-lens reflex cameras (SLRs) offer a great range of focal lengths and full manual control. Some are so compact that you can carry them in your pocket, making them ideal for preventing the squandering of valuable photo opportunities. These devices not only include cutting-edge photo sensors and CPUs, but also make use of advanced noise reduction methods. Get down on your hands and knees and adopt a stance resembling that of someone leaning against a wall. A steady hand is required for taking good photos when holding a camera far away from the body.
You'll have more leeway when doing post-processing work on photographs taken in RAW format. Adjusting the white balance or the contrast can help with over or underexposure, among other issues. The aperture of a lens determines how much light reaches the camera's sensor and the resulting depth of field. When the f-number is decreased, more light enters the camera, but the depth of field decreases. A shallower depth of field is achieved at the expense of light transmission when the aperture is narrow (a higher f-number).
The ability to zoom in on a specific detail with a wide-angle lens and the assurance of a consistently sharp image throughout the frame thanks to a small aperture. Both a Viewfinder Mode (A or Av) and a Shutter Priority Mode are standard on modern digital cameras (S or Tv). Instead of the shutter speed determining the aperture, it will be the other way around. Use a fast shutter speed and let the camera pick the aperture to capture a clear image of your dog racing towards you. Before each shoot, make sure the ISO is set appropriately for the lighting conditions.
If the flash on your camera isn't functioning, you may always use the one on your phone. Adjust the white balance and shoot at a higher ISO to capture slightly noisier images. If you want to do a comprehensive exposure check in-camera, you may use the histogram, a small graph that appears next to your photographs. The white balance of a camera can be changed to accommodate different lighting situations. A right-skewed histogram indicates that significant data loss occurred in the image's bright regions due to overexposure.
If you go down on an animal's or child's level, you can get closer and catch more natural reactions in your photos. According to the rule of thirds, pictures that aren't dead centre are more visually appealing and well balanced. Keep the scenery as basic and boring as you can so that attention stays where it should be. When the shutter is left open for several seconds or even hours, time lapse photography creates stunning effects. You should have image editing software on hand if you plan on shooting in RAW so that you can do things like trim, change the white balance, contrast, and brightness, and get rid of any blemishes.
Occasionally, even the most seasoned photographers will take a photo that is less than perfect. It's important to take a critical look at the image so you can figure out where you went wrong. It's possible that the solution can be found in a single tweak, such as the shutter speed or the composition. However, you'll be able to take stock of your weaknesses and make the appropriate adjustments.
Content Summary
- As a result of these factors, an increasing number of people are taking up photography as a hobby.
- There is a lot of pressure and expense involved in teaching creative subjects.
- You should begin by considering your motivations for acquiring these abilities.
- Images captured by digital cameras may now be on par with those captured by film cameras.
- These digital camcorders resemble and perform like standard cameras, yet they provide some useful upgrades.
- When photographers learn how simple it is to create great photos, they lose interest in elaborate cameras and lenses.
- While digital cameras have many similarities with their film-based predecessors, they also feature several innovative improvements.
- Taking better images with any camera is possible by adhering to these rules.
- However, when possible, dramatic light should be used to highlight the scene's most significant elements.
- Digital photography was initially met with scepticism from established photographers since the term "digital" suggests the technology is complex and challenging to understand.
- There are a wide variety of digital cameras to choose from, from simple point-and-shoots to high-end digital single-lens reflex cameras.
- Some, though, will work better than others for your particular photographic purposes.
- It only requires you to aim and fire, so anyone can use it.
- When modern digital cameras are equipped with high-quality optics or sensors, the results may surprise you.
- Basic cameras often contain a white balance option, but offer very little else in the way of image settings.
- This condition mirrors that of contemporary small cameras.
- Damage compensation, additional white balance controls, a restricted range of manual controls, and so on are all examples of such luxuries.
- Digital SLR telephoto lenses, like their 35mm film counterparts, offer a wide range of focal lengths and full manual control.
- The digital equivalents of these cameras are substantially smaller.
- Using a tripod to keep a camera stable is, without a doubt, the safest method.
- Unless the lighting is extremely dim, you probably won't need a tripod, but it's still best to keep the camera as steady as possible to avoid blur.
- Stabilize the camera by placing your left hand behind the lens and your right hand on the right side of the camera.
- Keeping a steady hand is less of a challenge when the camera is held closer to the body.
- Widening your stance, such leaning against a wall and going down on your knees, may assist you establish stability if you can't find anything to rely on.
- Shoot in raw format with the default settings and start shooting right away.
- Unlike compressed Jpeg files, those saved in RAW format retain all of the information that the camera's sensor captured.
- Photographs taken in RAW format provide you greater editing latitude.
- The larger file sizes that result from shooting in RAW is one drawback.
- Shooting in RAW, however, can considerably improve the quality of your images if you have the time and resources to do so.
- Changing your camera's image format from jpeg to RAW can be done in a number of ways; the instructions for doing so can be found in the user manual.
- The "exposure triangle" is a handy visual aid for remembering the relationship between ISO, aperture, and shutter speed, the three most important aspects of exposure.
- When shooting manually, having control over the aperture, shutter speed, or ISO is essential for capturing clear, well-lit images.
- The ISO setting determines the sensitivity of the camera to light.
- When the ISO is raised, the camera is more light-sensitive, and the camera is less light-sensitive when it is lowered.
- A lens's aperture determines the amount of light reaching the camera's sensor and the degree to which an object is in focus.
- Narrowing the aperture enhances the depth of field but at the expense of light transmission (a higher f-number).
- For instance, if you're taking a picture of a group of people, you can zero in on one person by using a wide lens and get everyone in focus by setting the aperture as small as possible.
- A tripod is highly recommended while working with a slow shutter speed.
- Portraits of people or animals benefit from an increased aperture because of the increased depth of field that results.
- If you want to focus on the subject, remove distracting objects from the backdrop.
- Remember that a larger f/ value indicates a narrower aperture and that the effect grows in proportion to the size of the aperture.
- Priority Mode allows you to quickly experiment with different aperture settings and view the results in the camera's viewfinder (Av or A).
- Therefore, when taking a picture of a scene where sharpness is essential, a small aperture should be chosen.
- Shooting at an aperture of f/22 or higher, if your lens permits, will result in the deepest depth of focus.
- You can experiment with various apertures without adjusting the shutter speed in Aperture Priority Mode (Av or A).
- Master the art of switching between Aperture Priority and Shutter Priority modes with ease and speed.
- Most cameras feature a Shutter Priority Mode and a Viewfinder Mode (A or Av) without getting too technical (S or Tv).
- In Viewfinder Mode, the shutter speed is determined by the aperture setting.
- A portrait with a blurred background is possible by letting the camera decide on the shutter speed and aperture.
- When shooting in Shutter Priority Mode, the shutter speed is controlled before the aperture.
- Select a fast shutter speed and let the camera pick the aperture to capture a clear image of your dog racing towards you.
- Some photographers avoid shooting in high ISO settings for fear of producing grainy or noisy final products, and this is a common misconception.
- When the ISO is increased, the image quality normally suffers, however, there are exceptions.
- In addition, even at ISO levels as high as 6400, current cameras can still take images of exceptional quality.
- An increased depth of field can help reduce noise in high-ISO images.
- Before we start shooting, let's make sure the ISO is set correctly.
- Check your camera's ISO setting before each shoot to avoid blurry photos.
- Red eyes and harsh shadows can be the effect of utilising a camera's flash at night or in dim lighting if care is not taken.
- As opposed to using the phone's flash, which could completely spoil the photo, it is usually preferable to increase the ISO and live with the resulting noise.
- However, there are times when you'll need to use the flash on your camera since there isn't enough natural light.
- The first thing to do is turn down the flash on your camera.
- Second, you should utilise anything to block the sun from the flash.
- You may increase the colour accuracy of your photos by tweaking the white balance.
- It can be tempting to check the LCD panel to determine if the photo was properly exposed, but this isn't always reliable.
- Photographs that are underexposed lean to the left.
- Find out how the histogram works and how it might aid in data analysis.
- If you want your photographs to stand out from the crowd, trying shooting from different angles.
- A picture taken from above or below a subject might convey a very different feeling.
- Getting down on a child's or animal's level will help you catch more natural expressions in your shots.
- Taking a picture from a bench is a great idea.
- Learn to apply the "Rule of Thirds" in your compositions.
- According to the "rule of thirds," images that are not centred are more visually appealing and balanced.
- If you're using the "rule of thirds" to compose your shots, you shouldn't position your subject or the scene's focal points dead centre. Instead, try placing them on an arc or at the intersection of two lines.
- Focus your gaze steadily on the subject's eyes to ensure that your attention is never diverted.
- To keep the emphasis where it should be, on the subject of the photo, keep the background as basic and uninteresting as possible.
- Blurring out an unflattering background in an image can be accomplished by adjusting the camera's angle of view, bringing the subject in closer to the lens, or increasing the aperture.
- A solid tripod is required to take sharp pictures in low light without increasing the ISO.
- Think about how much you plan to carry the tripod, how long it will last, and how tall it will be before making your initial purchase.
- In depth guidance on what to look for when purchasing a tripod for your camera is available in our Digital Photography Courses.
- The greatest time to take photographs, according to most photographers, is either early thing in the morning or last thing at night.
- Sunrise and sunset are ideal times to take photographs because of the soft, golden light that it casts on landscapes, people, and objects.
- It's not required that you take images outside during the golden hour, but it certainly make things simpler.
- Get some good photo editing software and help yourself out.
- Once you make the conversion to RAW, you'll need picture editing software to do tasks like cropping, correcting the exposure, white balance, and contrast, and removing imperfections.
- While Adobe Photoshop and Lightroom are undoubtedly the industry standards, beginners may find more success with programmes like Photoshop Elements, Picasa, and Paint Shop Pro.
- Remember that even the most seasoned photographers have off days where their photos just don't turn out.
- If you want your photos to stand out once more on Facebook, Instagram, Flickr, and 500px, you need to pick the best handful from each session.
- It's easy to get down on yourself when your photographs turn out poorly, but it's more productive to utilise these failures as opportunities to improve.
- Instead, you should take a critical look at the image to figure out where you went wrong.
- You will, however, be able to evaluate your photographic weaknesses and work to improve them.